
 Product Options
Product Options
Many types of product feature variations such as size, colour, shape, style, and so on. Rather than creating a separate product for each and every variance, Product Options can be placed on any product page so that customers can select the option that suits them.
If you sell clothing you can provide images that represent each available option, e.g. different fabric colours, different fabric textures, etc. If you sell spare parts or hardware, you could provide packet sizes of 10pcs, 25pcs, 100pcs, and so on.
Options can also be presented within selectable drop-down menu lists where customers select from the available options.
Multiple option groups can be placed on a product page and you can assign options to appear across an entire shop category to save time creating the same set of options for each and every product within that category (referred to as “global”).
Options can be created within a shop category or within a product - or globally across the entire shop.
On this page |
Screen illustrationsClicking this icon will display an illustration relevant to the step being described: |
Creating Product Options
Tip: Product imagesAlthough a product will appear immediately in your shop after you click the Save Product button, any new images uploaded to the product’s gallery will not appear until you Publish your website. |
Product Options can be added to a product or they can be added to a product’s category or sub-category as a Global Option. Product Options can also be added to every category in your shop as a shop-wide Global Option.
Why create Global Options within a product category or sub-category? If you populate a product category with products that all feature the same options such as garment size, colour, etc., setting those options globally will save you considerable time by not having to create the same set of options for each and every product within a category.
So long as the majority of products within a product category all use the same set of options, creating global options will save you time. If there is a minority of products that do not use the same options, you can instruct those products to ignore Global Options by selecting a simple Ignore checkbox within a product’s Options navigation tab.
To create product options across every product within a shop category, and all sub-categories beneath it:
- Go to My Shop and click on the Cog button next to the shop category in which global product options will be created. The Modify category pop-up window will open.
- Select Set global options for this category and click the Continue button.
- To create product options for a single product only, go to My Shop and click into the product you wish to add options to. With the product now open, click the Options navigation tab and follow these instructions:
- Create a new options group by click the + Add a New Option Group link.
- Enter a Title for the option that will appear on a product page, e.g. Size or Colour, etc.
- Description: Enter text to describe what this option is all about. This description will appear on the product’s page under the option title, e.g. “Please select a garment size from the options provided”.
- Position: If more than one option group is to be offered to customers (e.g. size, colour, style, etc.), enter a number into this box to position the option group, where 1 is the lightest weight (i.e. placing the option group at the top of all groups).
- Required: Select one of the two options from the drop-down menu list. If you select Yes - Customer must make a choice, the product can not be added to the customer’s cart until the customer chooses one of the options you’ve provided, e.g. size, colour, etc.
- Four different option-select types are possible. Select a Field Type from one of the three choices:
- Selection Box (most common): Provides customers with a drop-down list of options or a line of option images if you choose to upload images that represent each option, e.g. colour swatches, fabric styles, etc.
- Input Field: Provides customers with a text input field where they can enter a brief choice of keywords.
- Text Area Box: Customers will be asked to enter information into a text input field. Useful to capture larger amounts of data such as an address or message.
- File Upload: Customer will be asked to upload a file. Useful for, say, print-work or invitation lists.
- If you are creating an options-type Selection Box, complete the following fields:
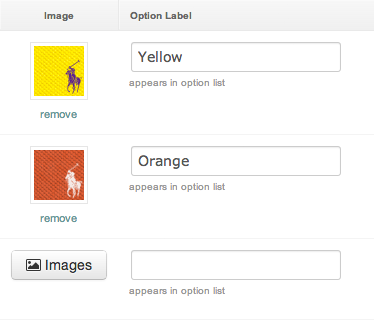
- Image: Display small thumbnail images that represent each selectable option, e.g. colour swatches, fabric styles, etc.

- If you prefer a drop-down menu (Selection Box) of choices instead of displaying images for each option, skip to Step 7. Otherwise;
- Click the Images button to open the Option Images pop up window. If images are already present they will appear in the AVAILABLE IMAGES pane.
- Select an option image from the available list or upload a new option image by clicking the Choose Files button, then selecting an image from your computer.
- Click Open; the file name of the selected image will now appear next to the Choose Files button and within the UPLOAD IMAGE list. Click Upload.
- Once uploaded, select the image file from the list of available images and click Use Image. The selected image now appears in the Image column.
- If necessary click remove to remove image.
- Complete your option details as follows:
- Option Label:This text will appear next to your option image or within the drop-down menu list if you choose not to use images.
- Cost: The effect that this variant has on the base price of the product. The variance can be either an addition to (+) or a subtraction (-) from the base price.
- Amount: Enter the amount by which the base price will be adjusted, e.g. 5.50.
- Variance type $ or %: There are two types of variation, set value and percentage. Select either of these from the drop-down list to change the price by that type.
- Option ID: A unique reference for your own use to identify the option when fulfilling customer orders.
- Pos.: Enter a numeric value to position the option within its drop-down menu in your shop.
- Click + Add a New Option Group link to add another options group if required.
- When finished click the Save Category button to save your new options group/s.